Proper preparation makes freezing green beans a snap, so you can have crisp, fresh-tasting green beans anytime you want! Only a few steps, like blanching the green beans, are needed before freezing to ensure the green beans keep their crunchiness, flavor, and color!

How To Freeze Green Beans
- Wash the green beans under cool, running water. Trim the ends off if desired. You can leave the bottom on if you want, but the top stems should be removed.
- Add the water and salt to a large stock pot and bring to a boil.
- Fill a large bowl with ice water and set it beside the stove.
- Add the green beans to the boiling water, stir, and cook until slightly tender but still crisp, about 2 to 3 minutes.
- Immediately remove the beans from the pot using a pair of long-handled tongs and transfer them to the ice water.
- Remove from the ice bath and gently pat the beans dry with clean towels or paper towels.
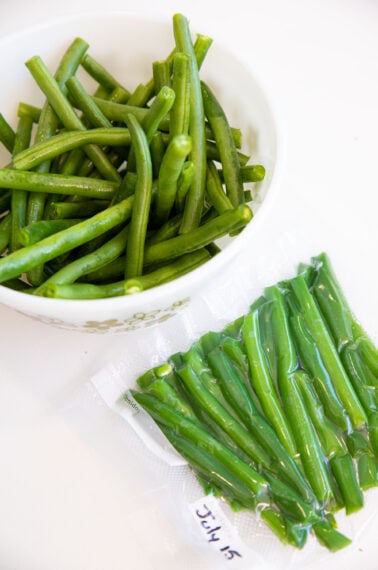
- Transfer the beans to the freezer bags, lining them up so they lie flat in one direction. Label with the date. Remove as much of the air as possible, either with a vacuum sealer or by pressing the air out of the bag gently with your hands, and seal the bag. Freeze and use within six months.
- To defrost simply remove from the freezer, open the bag slightly, and defrost in the fridge.

Meal Prepping Ahead
Freeze individual packets of green beans that are enough for a meal for your family. You can blanch and then freeze many pounds of fresh beans and separate them into portions in the freezer bags. Seal each one up and then write the date on it. Open the packet one on end and defrost it in the fridge when you are ready to use the beans.
Dunk in Cold Water, Then Dry
When you remove the green beans from the boiling water, they will continue to cook inside. Submerging them in cold water stops them from cooking. This makes them crisp up and keeps the color vibrant, especially green vegetables.


Vacuum Seal in a Bag
Sealing with a vacuum sealer is a snap and one of my most used kitchen tools when it’s time for garden harvest or bulk buying and freezing foods. When using the vacuum sealer, the key is to line up the green beans so they do not crisscross, and so when the air is pulled out, they don’t crush each other.


How to Seal in a Normal Freezer Bag
If you don’t have a vacuum sealer, you can also seal green beans in ziploc-style bags. Just put the green beans in the bag, line them up in the same direction, and squeeze out as much of the air from the bag with your hands as possible before closing the bag. You can also remove more air if you open one end just a tiny bit to slide in a straw and suck out more of the remaining air.
Happy Cooking
Love,
Karlynn
More How To's

How to Freeze Green Beans
Ingredients
- 1 pound green beans
- 6 cups water
- 2 tablespoons coarse salt
Instructions
- Wash the green beans under cool, running water. Trim the ends off if desired. You can leave the bottom on if you want but the top stems should be removed.
- Add the water and salt to a large stock pot and bring to a boil.
- Fill a large bowl with ice water and set it beside the stove.
- Add the green beans to the boiling water, stir, and cook until slightly tender but still crisp, about 2 to 3 minutes.
- Using a pair of long-handled tongs, remove the beans immediately from the pot and immerse them in the ice water.
- Remove from the ice bath and gently pat the beans dry with clean towels or paper towels.
- Transfer the beans to the freezer bags and line the beans up in the same direction. Label with the date. Remove as much of the air as possible, whether with a vacuum sealer or by pressing the air out of the bag gently with your hands, and seal the bag. Freeze and use within 6 months.
- To defrost simply remove from the freezer, open the bag slightly, and defrost in the fridge.
Notes
- You can use a vacuum sealer or simply put the beans in a freeze-safe bag and press as much air out as you can.
- Make sure the beans aren’t in too thick of a layer in the bag.
Nutrition


Leave a Comment or Recipe Tip